Getting Started with WebAssembly and Rust

I originally wrote this for LogRocket and posted it here with their permission.
This guide is an introduction on how to set up and work with a Rust WebAssembly environment. As for what you need to know, a basic understanding of Rust and web development should suffice.
I initially picked up Rust because of the fantastic work the team has done in supporting and pushing WebAssembly. Their official documentation is a great introduction for building an example project!
Understanding WebAssembly
WebAssembly (also known as Wasm) is a binary instruction format that most browsers have started to support. This enables languages, such as Rust, C, C++, Go, etc., to be compiled and ran in a web browser.
To clear up some misunderstandings, WebAssembly is not a replacement for JavaScript (also known as JS). Rather, it should be thought of as a way of offloading computationally heavy tasks to a more suitable language. Another benefit of this is that existing projects and libraries can now be ported to the web without needing to suffer through rewriting them in JS and the performance hits that come with that.
For those interested in taking the Wasm specification outside the web, The WebAssembly System Interface (WASI) may be of interest to you!
Downloading the Tools
With everything out of the way, we can start setting up our environment! Be sure to have the following installed on your computer.
- Rust (Ideally, an up to date version)
- Modern Web Browser (Internet Explorer doesn’t count!)
- Your favorite text editor
- A way to host a simple webserver (to avoid the browser nagging about cross-origin requests being blocked)
- If you have Python installed, there’s a nifty command for this!
- wasm-pack CLI
Why do we need wasm-pack? To reference from Ashley Williams’ Hello wasm-pack blog post,
wasm-pack is a tool for assembling and packaging Rust crates that target WebAssembly. These packages can be published to the npm Registry and used alongside other packages. This means you can use them side-by-side with JS and other packages, and in many kinds of applications.
For those that don’t know, Rust crates are close to what packages and libraries are for other languages. Crates work directly with Rust’s build system and package manager Cargo.
Creating & Building a Wasm Package
To create a new Wasm project, we can utilize the wasm-pack CLI. This should be familiar for those that create Rust projects through the cargo CLI.
sh
wasm-pack new hello-wasm
cd hello-wasm
The generated project is essentially a Rust library with boilerplate Wasm code.
Looking at the commands available in wasm-pack, it’s clear that there’s a focus for creating and publishing npm packages.
WASM-PACK SUBCOMMANDS:
build 🏗️ build your npm package!
help Prints this message or the help of the given subcommand(s)
login 👤 Add an npm registry user account! (aliases: adduser, add-user)
new 🐑 create a new project with a template
pack 🍱 create a tar of your npm package but don't publish!
publish 🎆 pack up your npm package and publish!
test 👩🔬 test your wasm!Although this is great for projects that have bundlers (Webpack, Rollup, etc.), we’re aiming for simple setup where we can import our Wasm binary in an HTML file. Thankfully, wasm-pack build has an argument to target other environments!
-t, --target <target>        Sets the target environment. [possible values: bundler, nodejs, web, no-modules]
                                [default: bundler]
The web target is exactly what we want! Once built, the output will create a pkg folder with multiple files that serve as the glue code between Wasm and JS. By the end of it, our Wasm binary will be exposed through a
JavaScript Module.
sh
wasm-pack build --target webRunning Wasm in the Browser
With the Rust code compiled to Wasm, we can begin going over how call it from JS. Start by creating a file called index.html in root of the project, and add the following:
html
<!DOCTYPE html>
<html>
<head>
<meta charset="utf-8" />
<title>My Wasm Project</title>
</head>
<body>
<script type="module">
// Importing WASM for the web target requires us to call an init function provided by the default module export.
// This is planned to be changed in the future.
import { default as wasm, greet } from "./pkg/hello_wasm.js";
wasm().then((module) => {
// The boiler plate project comes with a `greet` function that calls:
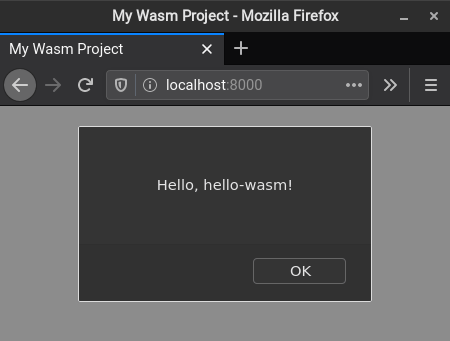
// `alert("Hello, hello-wasm!");`
greet();
});
</script>
</body>
</html>For security reasons, browsers tend to not let you import local resources from file://. This prevents us from importing the Wasm binary, but an easy solution is to just start a quick webserver.
If you have Python installed, you can use one of the following commands for this:
- Python 3:
python -m http.server 8000 - Python 2:
python -m SimpleHTTPServer 8000
We now have Rust code ready to run in a browser! Visit http://localhost:8000 to see it live. It should be a blank page with an alert.
Rust and JavaScript Interop
For the following code examples, you can edit the
index.html&src/lib.rsfiles to play around with the new changes. Remember to build each time you edit your Rust code!
Now that you’re familiar with building a project, it’s time to go over how to work with it. By default, Rust doesn’t directly have the ability to communicate with JS or Web APIs. This functionality is enabled through
wasm-bindgen. The project itself consists of multiple crates and a CLI tool. We’ve actually been using its CLI through wasm-pack!
Crates from wasm-bindgen:
- wasm-bindgen: Generates bindings and glue code between Wasm and JS.
- web-sys: Bindings for Web APIs.
- js-sys: Bindings for JavaScript’s standard, built-in objects, including their methods and properties.
- wasm_bindgen_futures: Facilitates converting between JavaScript Promises to Rust Futures.
Exporting Common Types
By importing wasm_bindgen::prelude::*, we’re given powerful abstractions for talking to JS. Here are some I want to highlight:
#[wasm_bindgen]: Macro that automatically handles most of our bindings between Rust and JS.JsValue: A representation for a data owned by JS.UnwrapThrowExt: A trait extension forOption<T>andResult<T, E>.
Assuming you’re editing src/lib.rs, the examples below show how to receive/return values with Wasm. Note that variables with an underscore (like _c) is a Rust convention for expressing that it’s unused.
rust
use wasm_bindgen::prelude::*;

// JS doesn't have a chars type which means:
// - The _c argument is the first char of a JS string.
// - The char returned will be a JS string.
#[wasm_bindgen]
pub fn char_example(_c: char) -> char {
    '🚀'
}

#[wasm_bindgen]
pub fn string_example(s: String) -> String {
    format!("Hello {}", s)
}

// str cannot be used as a return type.
// This is because we can't return borrowed references with the wasm_bindgen macro.
#[wasm_bindgen]
pub fn str_example(s: &str) -> String {
    format!("Hello {}", s)
}

#[wasm_bindgen]
pub fn number_example(n: i32) -> i32 { // assume the same for u32, usize, etc.
    n+100
}

#[wasm_bindgen]
pub fn bool_example(_b: bool) -> bool {
    true
}

// `Box<[JsValue]>` are the representation for a JS array object.
// When it comes to Js Arrays:
// - They are iterable.
// - Can contain multiple types by being of type JsValue (strictly typed arrays exist for numbers).
// - Don't really support N-dimensional arrays and are expensive to work with.
#[wasm_bindgen]
pub fn mixed_array_example(array: Box<[JsValue]>) -> Box<[JsValue]> {
    for value in array.iter() {
        // compute things...
    }

    vec![
        "Hello".into(),
        512.into(),
        JsValue::NULL,
        JsValue::UNDEFINED,
        61.20.into(),
    ]
    .into_boxed_slice()
}

// Typed arrays are only available for number types.
// For example, the function below will return a JS Int32Array type.
#[wasm_bindgen]
pub fn typed_array_example(_array: Box<[i32]>) -> Box<[i32]> {
    vec![1, 2, 3, 4, 5, 6, 7].into_boxed_slice()
}

// When it comes to Option:
// - Some returns the value inside.
// - None returns a JS undefined.
#[wasm_bindgen(catch)]
pub fn option_example() -> Option<i32> {
    None
}

// When it comes to Result
// - Result<T, JsValue> is the only supported signature. T must be convertible to a JsValue.
// - #[wasm_bindgen(catch)] must be used when returning a result.
// - Err will be equivalent to a JS thrown error.
// - Ok will return the value inside.
#[wasm_bindgen]
pub fn result_example() -> Result<i32, JsValue> {
    // With the wasm prelude imported, we can convert most common types by calling .into()
    Err("Look Pa, I'm throwing a JS error!".into())
}
Once the project is built again, these functions can be directly used in our web page. Feel free to play around and print the values returned.
html
<script type="module">
  import * as wasm from "./pkg/hello_wasm.js";

  wasm.default().then((module) => {
    wasm.char_example("R");
    wasm.string_example("Jane");
    wasm.str_example("John");
    wasm.number_example(28);
    wasm.mixed_array_example([2, null, undefined, "Hola", true]);
    wasm.typed_array_example([1, 2, 3, 4, 5, 6, 7, 8, 9, 10]);
    wasm.option_example();
    wasm.result_example();
  });
</script>
Exporting Structs & Enums
Expanding on what was explored above, enums and structs are a fairly simple export. Although there are some restrictions, the syntax should still feel like day-to-day Rust.
rust
use wasm_bindgen::prelude::*;

// When it comes to Enums:
// - They  are C styled.
// - JS represents them through an object with a number for each variant.
#[wasm_bindgen]
pub enum ExampleEnum {
    Yes,
    No,
}

#[wasm_bindgen]
pub fn verify_enum_choice(choice: ExampleEnum) -> bool {
    match choice {
        ExampleEnum::Yes => true,
        ExampleEnum::No => false,
    }
}

// When it comes to Structs:
// - Cannot contain lifetimes or type parameters.
// - Each field value must impl the Copy trait.
#[wasm_bindgen]
pub struct ExampleStruct {
    pub value: i32,
}

// For struct impl, we have the option for struct methods and type-level functions.
// JS handles structs by creating a JS object with a pointer (i.o.w. we can use references!).
#[wasm_bindgen]
impl ExampleStruct {
    pub fn new(value: i32) -> ExampleStruct {
        ExampleStruct { value }
    }

    pub fn read_method(&self) -> i32 {
        self.value
    }

    pub fn write_method(&mut self, value: i32) {
        self.value = value;
    }

    pub fn transfer_ownership(self) -> ExampleStruct {
        self
    }
}
Now we can import the struct and enum directly into our JS code. Once a struct is instantiated, we can call its Wasm compatible methods.
html
<script type="module">
import * as wasm from "./pkg/hello_wasm.js";
wasm.default().then((module) => {
// Enum \\
let rustEnum = wasm.ExampleEnum.Yes;
console.log(wasm.verify_enum_choice(rustEnum));
// Struct \\
let rustStruct = wasm.ExampleStruct.new(6);
console.log(rustStruct); // this will contain a pointer
console.log(rustStruct.value);
rustStruct.write_method(200);
console.log(rustStruct.read_method());
let newRustStruct = rustStruct.transfer_ownership();
rustStruct.read_method(); // rustStruct is now invalid. An error will throw.
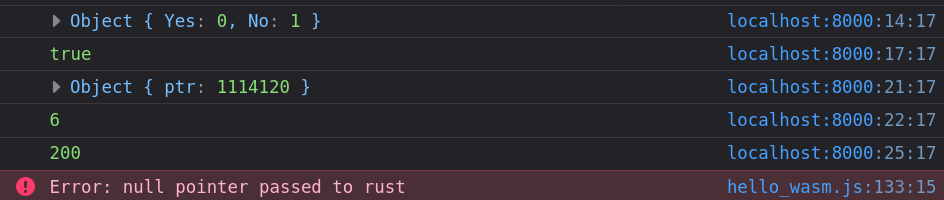
});
</script>We’ve provided an output image of the script below to better show how these types work. Notice how the enums and structs are represented in JS.
Manually Creating Bindings
The wasm-bindgen crate gives us powerful tooling for talking to JS. However, there are no direct bindings for the JS standard or Web APIs. That’s where web-sys and js-sys come in. Both crates provide ready made bindings that give us a standard interface to work with.
Of course, these crates don’t cover everything and we need to create our own bindings for anything missing. A common example is wrapping over custom JS classes and functions. When you first opened src/lib.rs you might’ve noticed a binding was created for the alert() function.
To see how to create our own custom bindings, we’ll first look over the JS code we want Rust to bind for.
html
<!--
  For simplicity, we'll add a class declaration to the global namespace.
  The goal, from rust, is to create this class, call a method, and get/set a property.
-->
<script>
  class Coordinate {
    constructor(x, y) {
      this.x = x;
      this.y = y;
    }

    printValues() {
      return `(x:${this.x} y:${this.y})`;
    }
  }
</script>

<script type="module">
  import * as wasm from "./pkg/hello_wasm.js";

  wasm.default().then((module) => {
    wasm.manual_bindings_example();
  });
</script>
On top of binding the Coordinates class, below are some examples on how to do the same for various JS functions.
rust
use wasm_bindgen::prelude::*;

// Although we're using what's in the global namespace, we can also import from other modules.
// #[wasm_bindgen(module = "./bar")]
// extern "C" {}

// Binding JS involves a bit of boilerplate because we have to specify each name
// and signature to bind.
#[wasm_bindgen]
extern "C" {
    // Bindings must be named as their JS equivalent
    fn alert(s: &str);

    // A different name can be specified as long as the original name is passed to the macro.
    #[wasm_bindgen(js_name = prompt)]
    fn ask(s: &str) -> String;

    // Functions can be from any js namespace.
    #[wasm_bindgen(js_namespace = console)]
    fn log(s: &str);

    // Using a different name allows us to specify various signatures.
    #[wasm_bindgen(js_namespace = console, js_name = log)]
    fn log_num(n: i32);

    //* JS Class example *\\
    // The process is a little verbose because create a binding for
    // each part of the class we want (class name, constructor, methods, setters, getters).
    type Coordinate;

    #[wasm_bindgen(constructor)]
    fn new(x: i32, y: i32) -> Coordinate;

    // methods must match the naming in the class declaration.
    #[wasm_bindgen(method)]
    fn printValues(this: &Coordinate) -> String;

    // getters are named as the property we want.
    #[wasm_bindgen(getter, method)]
    fn x(this: &Coordinate) -> i32;

    // setters are named the same as getters but with a `set_` prefix.
    #[wasm_bindgen(setter, method)]
    fn set_x(this: &Coordinate, x: i32);
}

#[wasm_bindgen]
pub fn manual_bindings_example() {
    alert("Hey buddy!");
    log(&ask("Tell me about your day!"));

    let coordinates = Coordinate::new(-4, 15);
    log_num(coordinates.x()); // prints -4

    coordinates.set_x(coordinates.x() * 2);
    log(&coordinates.printValues()); // prints (-8, 15)
}
Interacting With Web APIs
The majority essential web APIs are provided and documented by the web-sys crate. After specifying what APIs we want, we can:
- Edit HTML elements.
- Add event listeners.
- Print to the web console.
- Draw on a canvas.
- And more!
Since the list is extensive, we’ll simply cover how to set up and use this create. Add the following to the project’s Cargo.toml and then specify each web API you want to use.
toml
[dependencies]
web-sys = { version = "0.3.39", features = ['console'] }
rust
use wasm_bindgen::prelude::*;
use web_sys::console;

#[wasm_bindgen]
pub fn print_things() {
  // console has multiple log_x functions that represent how many items are being printed.
  // log_x takes in a reference to a JsValue so we need to convert the values we want to print.
  console::log_1(&"Printing from Rust!!".into());
  console::log_2(&"Numbers: ".into(), &1234.into());
}
web-sys Resources:
- Available Crate features: The full list of Web APIs.
- Official Example: Covers basic DOM manipulation.
Remember to take a look at the js-sys crate if you find yourself needing to import types and functions from standard JS.
Closing Thoughts
Although we couldn’t cover everything (Wasm has more to offer than can fit in just one blog post), I hope this guide was able to jump start your journey into WebAssembly! I highly encourage going though the wasm-bindgen docs to go over what we couldn’t cover here. It covers more in-depth examples and important topics like Sending Arbitrary Data Between JS & Rust. Keep in mind that the Rust WebAssembly ecosystem is still growing and it’s only going to get better from here!